Table of Contents
How to connect to Eduroam on Windows 11 - On Campus
- Select the Wi-Fi icon in the taskbar.
- Ensure wi-fi is on.
- Select 'Deakin Setup'.
- Uncheck the Connect automatically box, select then 'Connect'.
- Go to deakin.edu.au/deakinsetup (if it doesn't automatically happen) and select 'JoinNow'.
- Download and run the file as prompted.
- If prompted by SmartScreen, click 'Run anyway'.
- Select 'Yes' when prompted by User Account Control.
- Type your Deakin Username and Deakin Password.
- Select 'Next'.
- Click Done when the configuration process has finished.
Whenever you return to a Deakin campus, your device will automatically connect to the Eduroam wireless network.
| Note: If you are having trouble connecting to eduroam by following the steps above (via Deakin Setup), please follow the instructions below to connect using eduroam. |
Connecting to Eduroam
- Select Wi-Fi and connect to Eduroam
- Enter your username@deakin.edu.au
- Enter your password
How to Connect to Eduroam on Win 11 - Off-Campus
If you trying to connect to Eduroam from a different University or unable to connect to Eduroam directly, please follow these steps;
- Turn on your Mobile Hotspot
- Connect your Windows 11 Device to your Mobile Hotspot
- After connecting to your mobile hotspot on your Win 11 device, navigate to the Deakin Setup page. Here is the URL for the manual search www.deakin.edu.au/deakinsetup
- You should now be presented with below. You can now continue to follow the steps for Connecting to Eduroam on Win 11 - On Campus
Still can't connect to Eduroam?
Ensure DNS is set to automatic
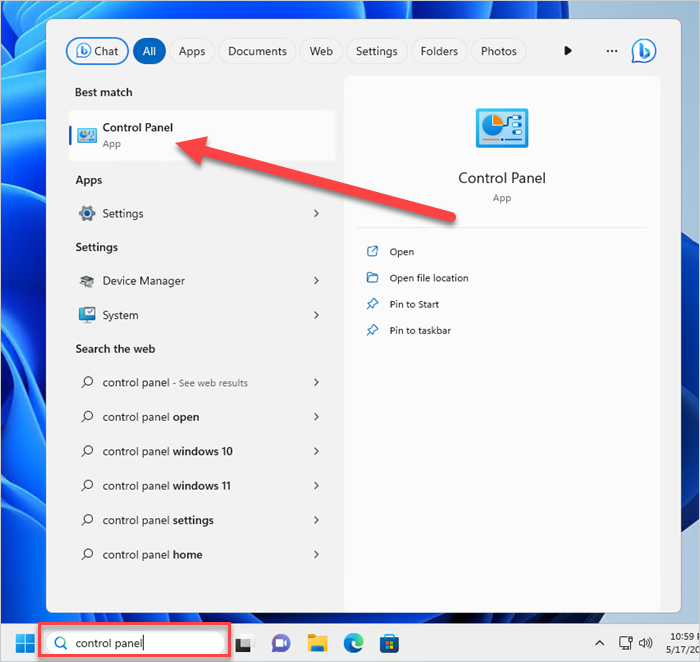
1. Enter control panel into your Windows Search bar

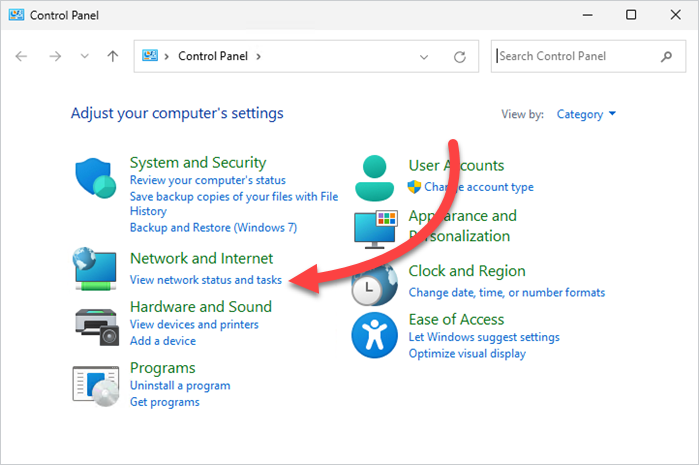
2. Click 'View network status and tasks' 
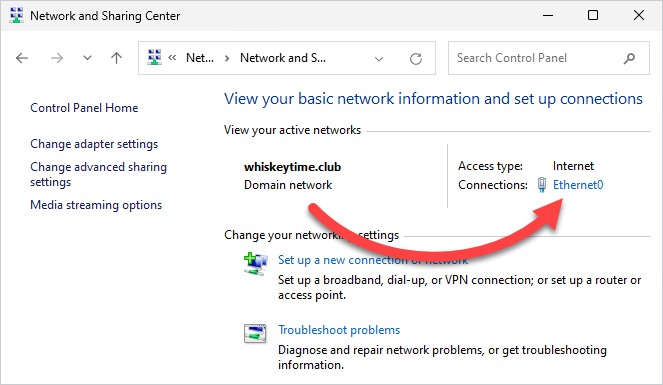
3. Click the name of your connection, it might be 'Ethernet' 'Eduroam' 'Wi-Fi' etc.
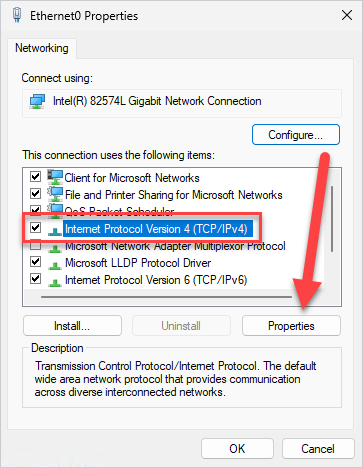
4. In the window that appears, click 'Properties'
5. In the properties window, select 'Internet Protocol Version 4 (TCP/IPV4), then click Properties.

6. Select 'Obtain IP address automatically' and 'Obtain DNS server address automatically' 
7. Try to reconnect once again
You can try to remove/forget the existing eduroam setup on your device, then complete the Eduroam setup again.